Shading is one of the most powerful tools in pencil art, transforming flat sketches into lifelike, three‑dimensional drawings. By understanding how light interacts with objects, artists can create depth, texture, and mood. Whether you’re a beginner or refining advanced skills, mastering shading techniques will elevate your artwork to a professional level.
Understanding Light Sources
Before you can shade effectively, you must understand where the light is coming from. The position, intensity, and type of light source determine how shadows and highlights appear.
- Single Direct Light – Creates strong contrast and defined shadows.
- Diffuse Light – Produces softer shadows and gradual transitions.
- Multiple Light Sources – Can create overlapping shadows and complex lighting.
- Natural Light – Changes throughout the day, affecting shadow length and tone.
- Artificial Light – Offers consistent control over direction and intensity.
Knowing your light source helps you plan your shading so it looks intentional and realistic.
The Elements of Shadow
Shadows are not just dark areas — they have structure and variation. Understanding these elements will make your shading more convincing.
- Core Shadow – The darkest part of the shadow on the object itself.
- Cast Shadow – The shadow the object projects onto another surface.
- Highlight – The brightest spot where light hits directly.
- Midtones – The transition areas between light and shadow.
- Reflected Light – Light bouncing back into the shadow from nearby surfaces.
By including all these elements, you create depth and realism in your drawings.
Pencil Grades and Their Uses
Different pencil grades produce different tones and textures. Choosing the right one for each stage of shading is essential.
- H‑Grade Pencils (2H, 4H, etc.) – Hard lead, light marks, great for fine details.
- HB – Balanced hardness, good for initial shading.
- B‑Grade Pencils (2B, 4B, 6B, etc.) – Soft lead, dark marks, ideal for deep shadows.
- 8B and Softer – Extremely dark, rich tones for dramatic contrast.
- Mechanical Pencils – Consistent line width for precision work.
Using a range of pencils allows you to build smooth gradients and rich tonal variety.
Shading Techniques for Realism
There are several methods to apply graphite for different effects. Mastering these will give you control over texture and tone.
- Hatching – Parallel lines to build tone.
- Cross‑Hatching – Overlapping lines at different angles for depth.
- Stippling – Dots for subtle texture and shading.
- Circular Shading – Small overlapping circles for smooth gradients.
- Blending – Using tools to soften and merge tones.
Experimenting with these techniques will help you find the style that best suits your subject.
Blending Tools and Methods
Blending smooths transitions between light and dark, creating a polished look. The right tools make a big difference.
- Blending Stumps/Tortillons – Paper tools for precise blending.
- Tissues – Soft, broad blending for large areas.
- Cotton Swabs – Good for small, controlled areas.
- Brushes – Lightly sweep graphite for a soft finish.
- Finger Blending – Quick but less precise; can add oils to paper.
Controlled blending enhances realism while keeping textures intact.
Creating Depth with Value Range
A strong value range — from the lightest lights to the darkest darks — is key to making drawings pop.
- Light Values – Suggest highlights and illuminated areas.
- Mid Values – Provide form and volume.
- Dark Values – Add drama and depth.
- Contrast – High contrast draws attention; low contrast creates subtlety.
- Gradation – Smooth transitions between values for realism.
Balancing values ensures your drawing feels dimensional and dynamic.
Common Shading Mistakes to Avoid
Even skilled artists can fall into habits that weaken their shading. Awareness helps you avoid them.
- Overblending – Can make drawings look flat and lifeless.
- Uniform Shadows – Real shadows vary in tone and edge sharpness.
- Ignoring Light Source – Leads to inconsistent shading.
- Too Few Values – Limits depth and realism.
- Smudging Unintentionally – Handle paper carefully to avoid marks.
Avoiding these pitfalls will keep your shading clean and intentional.
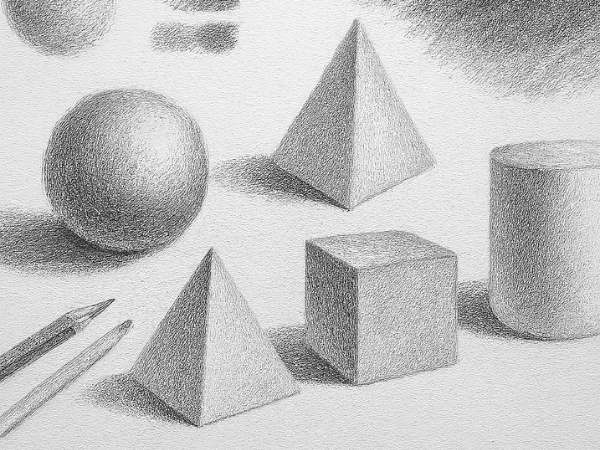
Practicing Shading with Simple Forms
Before tackling complex subjects, practice shading on basic shapes to understand light and shadow behavior.
- Spheres – Learn smooth gradations and reflected light.
- Cubes – Practice sharp edges and multiple planes.
- Cylinders – Work on curved surfaces and consistent light falloff.
- Cones – Combine curved and pointed shading.
- Pyramids – Explore angular shadows and highlights.
These exercises build a strong foundation for more detailed work.
Applying Shading to Real Subjects
Once you’re confident with forms, apply shading techniques to real-life objects and scenes.
- Portraits – Capture facial contours and subtle skin tones.
- Still Life – Emphasize texture and material differences.
- Landscapes – Create depth with atmospheric perspective.
- Animals – Suggest fur, feathers, or scales with directional shading.
- Architecture – Highlight structure and light interaction.
Real-world practice helps you adapt shading techniques to any subject matter.
Developing Your Personal Shading Style
While mastering fundamentals is essential, your unique style will set your work apart.
- Experiment with Pressure – Varying pressure changes tone and texture.
- Mix Techniques – Combine hatching, blending, and stippling.
- Play with Contrast – Use dramatic or subtle lighting for mood.
- Incorporate Texture – Suggest materials like wood, metal, or fabric.
- Refine Over Time – Style evolves with practice and experimentation.
Your shading style becomes part of your artistic signature, making your work instantly recognizable.