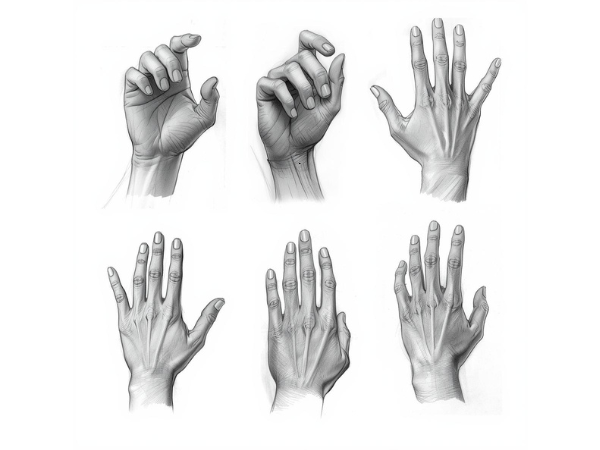
Hands are one of the most expressive yet challenging parts of the human body to draw. Their complex anatomy, wide range of motion, and subtle details make them a true test of an artist’s skill. This guide breaks down the process into nine essential areas to help you capture realistic hands with confidence.
Why Hands Are Difficult but Essential to Master
Hands are notoriously tricky because they combine intricate anatomy with expressive gestures. Unlike faces, which follow predictable proportions, hands vary greatly in size and shape. Yet, they are vital in storytelling—gestures can convey emotion, intention, or character.
Challenges and importance of drawing hands:
- Complex anatomy with 27 bones and numerous muscles.
- Wide range of motion and flexibility.
- Hands communicate emotion and personality.
- Essential for storytelling in illustration and comics.
- Difficult to simplify without losing realism.
Mastering hands elevates your art, making figures believable and expressive. By studying anatomy and practicing regularly, artists can transform hands from intimidating obstacles into powerful storytelling tools. Over time, confidence in drawing hands will also improve your overall figure drawing skills.
Breaking Down Hand Anatomy: Bones and Structure
The skeletal framework of the hand is the foundation for realistic drawing. Understanding bone placement ensures accurate proportions and natural movement.
Key anatomical structures:
- Carpals – Eight wrist bones forming the base.
- Metacarpals – Five bones shaping the palm.
- Phalanges – Finger bones (three per finger, two for the thumb).
- Knuckles – Visible joints where bones meet.
- Thumb Structure – Unique with only two phalanges, allowing opposable movement.
Visualizing the hand as connected blocks and cylinders helps artists avoid flat drawings. By internalizing bone placement, you’ll prevent mistakes like misaligned fingers or unnatural bends. This skeletal knowledge provides the blueprint for adding muscles, tendons, and skin details later.
Muscles, Tendons, and Movement
Beyond bones, muscles and tendons give hands their flexibility and volume. Tendons create subtle ridges, while muscles add fullness to the palm.
Important features to observe:
- Flexor Tendons – Control finger bending.
- Extensor Tendons – Visible on the back of the hand.
- Thenar Muscles – Control thumb movement.
- Hypothenar Muscles – Control pinky movement.
- Palm Pads – Add volume and softness.
Capturing these details adds realism and prevents stiffness. Simplify by sketching muscle masses first, then refine with tendon lines. Observing how tendons shift during movement helps artists depict hands dynamically rather than statically.
Simplifying Hands into Basic Shapes
Breaking hands into geometric forms makes complex poses manageable. This technique is especially useful for beginners.
Basic shape breakdown:
- Palm as a box or rectangle.
- Fingers as cylinders.
- Joints as spheres.
- Thumb as a wedge.
- Wrist as a connecting block.
Starting with these shapes ensures perspective and foreshortening look natural. Once the structure is established, refine into anatomical detail. Practicing with simplified forms builds confidence and helps artists tackle intricate poses without being overwhelmed.
Proportions and Finger Lengths
Proportions are key to realistic hands. Each finger has a distinct length and placement relative to the palm.
General proportions to remember:
- Middle finger is the longest.
- Index and ring fingers are slightly shorter.
- Pinky is the smallest.
- Thumb sits lower and moves differently.
- Palm length roughly equals finger length.
Accurate proportions prevent distortion and ensure hands look natural. Observing real hands or using references helps correct common mistakes like uniform finger sizes. Proportion studies also improve consistency across different hand poses.
Gesture Drawing: Capturing Expression
Hands are incredibly expressive, capable of conveying emotion without words. Gesture drawing focuses on capturing energy rather than detail.
Gesture drawing tips:
- Use flowing lines to represent motion.
- Sketch quick poses like open palms or clenched fists.
- Focus on rhythm and movement.
- Avoid stiffness by exaggerating curves.
- Refine structure after capturing energy.
Gesture practice teaches artists to prioritize expression. Over time, these sketches become the foundation for detailed drawings. Hands drawn with gesture feel alive, adding emotional depth to your artwork.
Shading and Adding Depth
Shading transforms flat outlines into lifelike hands. Light and shadow reveal form, emphasizing knuckles, tendons, and muscle volume.
Shading techniques:
- Use soft shading for palms.
- Strong contrasts for the back of the hand.
- Highlight nails and wrinkles subtly.
- Pay attention to light source direction.
- Practice with simple lighting setups first.
Shading not only adds depth but also conveys texture. Beginners should focus on consistent light sources to avoid confusion. Over time, shading mastery will make hands feel tangible and realistic.
Common Mistakes and How to Fix Them
Artists often struggle with recurring errors when drawing hands. Recognizing these mistakes is the first step to improvement.
Frequent mistakes:
- Fingers drawn too straight or stiff.
- Ignoring perspective, leading to flat drawings.
- Over‑simplifying joints.
- Excessive smoothing of skin.
- Awkward thumb placement.
To fix these, study references, practice gesture sketches, and break hands into shapes. Avoid rushing—hands require patience. By identifying and correcting mistakes, artists steadily improve accuracy and confidence.
Practice Strategies for Improvement
Mastery comes from consistent practice. Hands require repetition and observation to become intuitive.
Effective practice methods:
- Daily sketches of simple hand poses.
- Use photo references or mirrors.
- Alternate between anatomy studies and gesture drawings.
- Join art communities for feedback.
- Experiment with different styles.
Consistent practice builds muscle memory, making hand drawing easier over time. With persistence, hands evolve from daunting challenges into expressive highlights of your artwork.