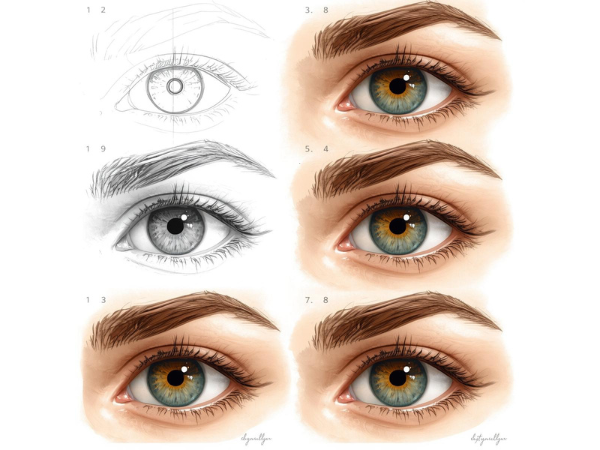
Drawing realistic eyes is one of the most rewarding challenges for artists. Eyes are often called the “windows to the soul,” and capturing their depth, emotion, and detail can elevate any portrait. Whether you’re a beginner or an experienced artist, learning how to draw eyes step‑by‑step will help you improve your skills and create lifelike artwork.
1. Understanding the Anatomy of the Eye
Before drawing, it’s essential to understand the basic anatomy of the eye. Knowing the structure helps you avoid flat or cartoonish results.
- Eyeball (sclera): The round white part of the eye.
- Iris: The colored circle that surrounds the pupil.
- Pupil: The dark center that controls light intake.
- Eyelids: Upper and lower lids frame the eye and create depth.
- Eyelashes: Protect the eye and add texture.
- Tear duct: Small detail at the inner corner of the eye.
Understanding these parts ensures your drawing looks anatomically correct. Even if you stylize later, a strong foundation in anatomy makes your art more convincing.
2. Tools and Materials You’ll Need
Having the right tools makes the process smoother and allows for better shading and precision.
- Graphite pencils (HB to 6B): For outlines and shading.
- Eraser (kneaded and precision): For highlights and corrections.
- Blending stump or tissue: To smooth shading.
- Drawing paper: Medium‑to‑heavy weight for layering.
- Reference photo: Helps capture realistic proportions.
With these tools, you can achieve fine details and smooth gradients. Investing in quality materials also reduces frustration and helps your drawings look professional.
3. Sketching the Basic Outline
Start with light lines to establish proportions. Avoid pressing too hard, as outlines should be adjustable.
- Draw an almond shape: Represents the eye’s outer contour.
- Mark the iris and pupil: Center them within the almond shape.
- Add eyelids: Sketch curves above and below the eye.
- Indicate the tear duct: Small oval at the inner corner.
- Outline eyelashes lightly: Avoid heavy strokes at this stage.
This outline acts as your blueprint. Keeping it light allows you to refine details later without erasing harsh lines.
4. Shading the Iris and Pupil
Shading brings depth and realism to the eye. The iris is especially important because it conveys emotion and individuality.
- Darken the pupil: Make it the darkest part of the eye.
- Shade the iris: Use circular strokes to mimic texture.
- Add radial lines: Draw lines radiating outward for realism.
- Blend carefully: Smooth transitions between light and dark areas.
- Leave highlights: Preserve small white spots for reflection.
Shading the iris correctly makes the eye look alive. Remember that highlights should always align with the light source in your drawing.
5. Adding Eyelids and Eyelashes
Eyelids and eyelashes frame the eye and add dimension. They must be drawn with care to avoid looking artificial.
- Upper eyelid: Shade lightly to show depth.
- Lower eyelid: Add subtle shadow beneath the eye.
- Eyelashes: Draw curved, tapered lines, not straight spikes.
- Vary length and direction: Eyelashes should look natural.
- Avoid uniformity: Randomness creates realism.
Eyelids and lashes are often overdone by beginners. Keeping them subtle ensures the eye remains the focal point without distraction.
6. Creating Realistic Highlights and Reflections
Highlights make eyes look glossy and alive. They are essential for realism.
- Identify light source: Decide where the light hits the eye.
- Add white spots: Place highlights on the iris and pupil.
- Use eraser for precision: Lift graphite to create shine.
- Reflective details: Add faint reflections of eyelashes or surroundings.
- Balance highlights: Avoid making them too large or too bright.
Highlights give the illusion of moisture and depth. Without them, eyes appear flat and lifeless.
7. Common Mistakes to Avoid
Many beginners struggle with certain errors when drawing eyes. Recognizing them helps you improve faster.
- Overly dark sclera: The white of the eye should remain light.
- Uniform eyelashes: Real lashes vary in length and angle.
- Flat iris: Forgetting texture makes eyes look dull.
- Ignoring eyelids: Without lids, eyes look pasted on.
- Misplaced highlights: Incorrect placement breaks realism.
Avoiding these mistakes ensures your drawings look polished. Practice correcting them until they become second nature.
8. Practice Exercises for Improvement
Consistent practice is the key to mastering realistic eyes. Try these exercises to build skill.
- Draw from photos: Practice different angles and lighting.
- Focus on irises: Fill a page with iris studies.
- Eyelash drills: Practice varied lengths and curves.
- Highlight placement: Experiment with different light sources.
- Timed sketches: Improve speed and confidence.
Drawing realistic eyes requires patience, observation, and practice. By understanding anatomy, using proper tools, sketching carefully, shading with precision, and adding highlights, you can create lifelike eyes that capture emotion and depth.